Monday, 25 November 2013

Camera Angles

Camera angles are used for the purpose of conveying different meanings about what is on screen to the audience.

Eye-Level - This is the standard angle and the most common. It shows what how we would see an area or person in real life. For example in Men in Black this shot shows an Eye-Level shot of Jeeb's, the shot is to show where he is looking at but other than that doesn't have any other meaning angle wise.


High Angle - A high angle is when the camera is positioned high and looking down on an area or people. this can be done to show status, the characters positioned high has higher status then those positioned below. It can also be used to portray the hight of different characters, in Rush Hour 3 the camera is positioned at a high angle to show how much taller the man is to Carter.


Low Angle - It is used the same as high angle but from those from the lower status view so the camera is positioned down looking up. The soldiers at the bottom are at the lower status looking up at Farquaar who is the higher status. And in rush Hour 3 instead of being from the view of the giant man looking down on Carter it is from Carter's view looking up at the giant man, again this is done to show how tall the man is in this situation.


Bird's Eye - Is a angle that shows a scene from either directly above or high above. It is often used in establishing shots to show a city so the audience know where the events are taking place. It can also be used to show a lot of the scene and the space between characters as well as other objects in the scene that otherwise wouldn't be seen by the audience.


Dutch Tilt - This is where the camera is purposely tilted to one side so that the scene is at an angle. This can be used to portray the mental unstableness of the character in the shot or that something isn't quite right with what is being shown on screen. In the Dark Knight while the Joker hangs up side down the camera turns so that he is right side up but the horizon in the background shows that the camera is at an angle to connote the Joker's insanity.


Monday, 18 November 2013

Idiot's Guide To Post Production Process

First you must create a folder that you will store all of your work, this folder must be in an area that you know you can always find so that you don't loose your work.


To do this you can simply right clicking on the desktop and clicking "New Folder," this will make an empty folder that is easy to find however this means that anyone logged in can also get into it.


You can find an area in the computer and create a new folder if you feel it would be more secure. Click "Finder" on the bottom left (picture of a blue face) and choose one of the folders you want your work folder to be in, then right click and select "New Folder." Or you can save a folder on a memory stick using the same method of right clicking just in the memory stick.


                                                                             You must then ensure that all the files you want to use for you production are in this new folder you have created. Do this by finding any files you may have downloaded from Youtube or anywhere else and dragging them into the new folder you have created.

If you have filmed footage on a camera, connect the camera to the computer use "Spotlight" at the top right to search Final Cut Pro. You must then create a Scratch Disk so that any files you capture will be stored in this file including rendered files, waveform, cache and autosaves.


To do this open Final Cut Pro go into the "Final Cut Pro" tab and select "System Preferences," next to the line of ticks click "Set" and use the drag down menu to find the location of the folder that you previously made for all of your work. This is now your Scratch Disk were all the files you put into Final Cut will be stored.


                                                          To get the footage from your camera onto Final Cut Pro go into "File" and then "Log And Transfer" to copy all of you footage from camera in Final Cut Pro. If you have made your Scratch Disk all of your footage will be saved into your folder with all of your work.


In Final Cut Pro you can create a Sequence this is the order that you put your footage on the timeline to do this drag the footage either from your folder or if you have logged and transferred footage from a camera it should already be in Final Cut Pro and you can then drag it into the timeline. A red line may appear on top of the timeline, this means it needs to be rendered. To do this go to "Sequence" and then "Render All" and then it will take a few seconds for the video to render and it should now play.


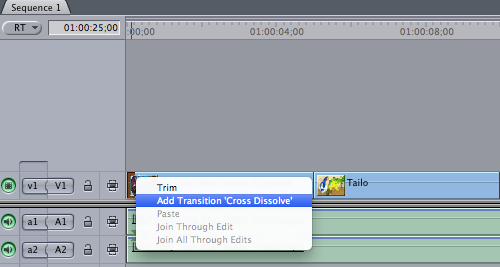
To add crossfades to you clips simply go to the beginning or end of the clip. Right click and select "Add Transition 'Cross Dissolve'.


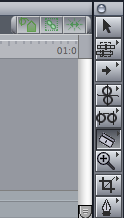
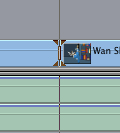
If you want cut a clip move the mouse to the side bar on the far right of the timeline. There will be a razor blade icon. Select this icon and the mouse will change to have a cross next to it. It will change into the blade when you scroll over the video track.


 Then simply click on the section you want to cut and it will be split so you can move the two sections apart.


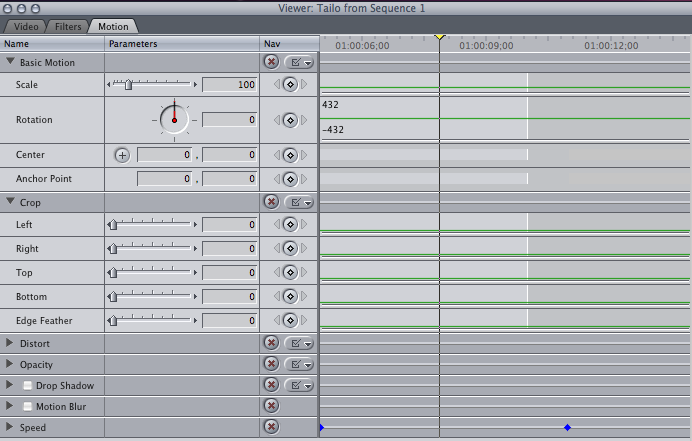
If you want to crop the image shown in the video, go to the first window that shows the video. On top of the screen it will say "Video/Filters/Motion. Click on motion and scroll down until you find "Crop." When you click on crop, multiple buttons will appear that you can click and drag.


By dragging them parts of the image on screen will be cropped. you must make sure you double click on the part of the video on the timeline that you want to crop.


                  You can also have multiple Sequences on one project, doing this allows you to create a rush which is were your sequences can be reviewed quickly because they are in the same project meaning you can receive feedback for all of them quickly. To do this right click in the big box that has "Sequence One" in it and click "New Sequence" this will create "Sequence Two."


Videos can be exported in different files, this is because different files have different purposes. For example for the video to be the highest quality you may want it to be an MOV format and uncompressed.  in Final Cut Pro you can use Quick Time Movie  a high quality compressed version of your current sequence in a MOV file which is an Apple format. Or you can use Quick Time Conversion which means that the video can be converted to a wider choice of formats. To do this go to "File" then "Export" and select "Quick Time Movie." Name your sequence and save it to your folder, wait for it to finish exporting.


Or select "Quick Time Conversion" and click the drop down option that is on "Quick Time" by default. Choose the option best sooted to your need from the drop down list. This may be because the video you want needs to be in a format for mobiles specifically, or the internet or DVD's. 


Tuesday, 12 November 2013

Avatar - Foley Sound

https://vimeo.com/81506278

0.02 secs need the sound of the clip need the sound of the rope swinging the through the air. I will record the sound of a wooden pole being swung hard through the air to make this sound.

0.00 - 0.32 secs. The reptile also needs to making growling noises I will use human voice to try and make the sound of the creature.

0.00 - 0.34 background noise is needed, the sound of wind/ birds needs to recorded. I may also more noises similar to the reptiles to but in the background.

0.05 - 0.17 secs. The reptile flaps it's wings during this time, I can use the sound of fabric waving in the air like a leather coat to make this noise.

At 0.14 secs the Na'vis start cheering, I will be using human voices to create this sound and since they are holding arrows I will be banging pieces of wood together for when they wave their arms.

The man tries to ride the reptile from 0.03 sec to 0.34 secs so I will be using human voices to make grunting sounds to match with him struggling against the reptile as well as when he nearly falls of the cliff.

At 0.34 secs the man gets flung to the edge of the cliff, I will need to make noise for him bouncing along the ground and grabbing the vine on the cliff. I will do this by hitting a material bag and crushing some rocks against each other.

Throughout the clip jungle sounds are in background.

Since I worked alone I recorded all of the sounds in the video. The reptile noises seemed to match with the action and the patting on the ground also seemed well timed. The added background noise also helps all of the sounds link together and not sound out of place or sudden. Although the flaps of the wings fit with the video it is also very quiet and if done again should be louder. The sound of the clinking of the bows is missing but it doesn't seem to impact the video to much. However the sound of the man's voice trying to ride the reptile is also missing which is a bit more noticeable. The sounds where fitting for the films target audience as it was intended to sound as realistic as possible and no effects where added. Panning was used to make the sounds of the wings hitting the ground sound like it was coming from the appropriate sides, this was also done with the shouting.

Monday, 11 November 2013

Cables

Multiple cables are made with different purposes and qualities. Some are for audio and others for visual.
Such as the composite (analogue) video cable, this cable is yellow and allows visual with analogue transmission but no audio. It carries standard definition typically at 480i and 576i resolution. It is used for standard formats such as NTSC/PAL and SECAM. It only carries one channel and doesn't have as high quality as other cables. 

   
Separate video, more commonly known as S-Video (analogue) cable has a higher definition then the component cable and can carry two channels by separating black and white colour signals meaning it makes a better image but at lower resolution than the composite video cable. It also carries the standard definition of 480i and 576i. Each signal pin is paired with it's own ground pin which is why there is four. The fifth is used to hold the cable in. 

The component video (analogue) uses red, green and blue coloured cables to distribute the signal three ways. It allows resolution up to full HD but because of digital TV's, conversion is needed to create artefacts with edge clarity.
   
VGA (analogue) is usually used for connecting computer monitors, the fifteen pins can connect to video cards, laptops and can be bring the screen of the computer on to HD TV's as well as other equipment. It uses the same red, green and blue method like the component cable and allows high resolution from 640x400 up to 2048x1536 but needs coaxial wiring and insulation for higher quality and doesn't carry audio meaning another audio cable is needed if videos are to be watched on the HD TV screen from the computer.  


Digital Virtual Interface or DVI cable is a digital cable which means it uses a binary code of ones and zeros to transfer the data meaning there is no loss in the quality. It is used on HD TV's and video cards. The interface is designed to transmit uncompressed digital video and can be configured to support multiple modes such as
DVI-D, DVI-A, DVI-I. The cable comes in single and dual link and uses resolution up to 3840x2400 but doesn't have audio.  


A single cable that can carry both audio and visual is the HDMI cable which uses digital meaning it like the DVI uses binary to cary the data meaning no signal is lost. It is used for computers, cameras, monitors, blu-ray and gaming consoles like the playstation 3. There are different versions that allow different quality like version 1.0 for  1920x1080p and version 1.4 for 3840x160p at 30 frames per second (fps) and also supports 3D. There is also a version 2.0 which supports 3840x2160p at 60 fps.  


The RCA cables (analogue) are used to carry video and audio signals through different wires. It is primarily used for stereo equipment and is still used for other devices from before and after the digital switch over like VHS, DVD players and TVs. However the longer the wire the more of the quality is lost and a lot of it can even pick up radio waves meaning other noise and hum can show up in the audio. 

Phone connector (analogue) uses 1/4 jack and 1/8 jack (3.5 mm) which can be found in phones, DSLR's while the 1/4 jack is typically used for audio recording equipment, stereo equipment and guitar and bass leads. The tip is the positive part while the rings are negative and the sleeve stands as the earth. 


XLR conector (digital) is the most common cable used for microphones, the three to seven pins work in a similar way to the phone connector jack's. There is a female connector (left) and male connector (right). Te female is used for source while male is used for input. The are clips on the connector so that they are held in and don't disconnect if something pulls on them.


Thursday, 24 October 2013

Three Movie Clips Analysing Sound


Fifth Element - Diva opera Scene
http://www.youtube.com/watch?v=IoW_ZOfsrzA
The Diva's singing starts of a diegetic sound but it still continuous even when the scene switches to other places of the ship, here it becomes non-diegetic as none of the characters outside the opera can hear the music even when the audience can. Apart from the music all of the sound effects are diegetic such as the gun shots, punching sounds etc. Panning isn't used for the music or singing, even when the camera focuses on members of the audience in different areas relevant to the Diva the music and singing doesn't change depending on where it's heard and remains central, this is done because the music is meant to be focused on by the audience of the film and not the audience of the opera. By doing this it means when the music picks up it feels like it has been built up to go with the action that also picks up. Mixing is used a few times during the opera, when other events are taking place throughout the ship, the music becomes slightly quieter so that we can focus on the dialog of the other characters. Also when the Mangalore (the aliens) knocks on the door his line "champaign for the Diva" has been made louder so that it sounds on level with the man closest to the camera instead of sounding quieter like you would expect since he says it through a door. Again this insures that the audience can focus on the events occurring and highlights the importance of what is currently happening. Also as the Mangalore's break into the Diva's hotel room their grunts become quieter as the camera focuses on Leeloo whose breath becomes louder. When the action starts mixing is used to make the punching sound very exaggerated. Foley sound has been used to make the punching sounds specifically because the sound wouldn't be loud enough or sound how they wanted it to without foley. When Leeloo kicks the blade in the Mangalore's hand the sound of the blade is also foley, used to make the blade seem more threatening and also it being more surprising when Leeloo is able to break it. The growls of the Mangalore's is also foley and is used to fill in what would've been white noise if the scene of them rummaging in the hotel had been left without it.

Final Fantasy VII Advent Children - Fight in Forgotten City
http://www.youtube.com/watch?v=Tc9G-vjik8A
Panning is used on the motor bikes sound, as it starts of further away from the camera or other characters it is quieter but as it gets closer it gets louder. It is also used on the sound of the gunshots and the sound of the ground moving in the same way. Panning is also used for the movement of the red cloak, as it jumps right to left and briefly closer to the screen before flying far away the sound of the material movement also follows this pattern being heard right to left and then louder when closer to the screen and then quieter as it flies away. This is done so that audience can gage how close or far away the action is and helps build up the tension as seen when the motorbike is getting closer to the children the tension grows, we know the motorbike is close not because we can see but because we can hear it getting louder. When Cloud enters the flower field mixing is used to make Aerith's voice seem slightly louder, it is also more echoey while Cloud's voice remains at a neutral level, this makes her sound more ethereal and shows the audience that she is different in some way to Cloud. Mixing is also used to make the children's footsteps sound loud when they jump on the path, everything goes quiet when they appear apart from their steps. The clicking heard at the beginning of the clip that also appears again in the clip is a non-diegetic sound used to represent the virus in the characters however it cannot be heard by any of them. The music that plays during the Flower Field scene and during the battle scene is also non-diegetic used to enhance the atmosphere. However the sounds of the sword's shing, gunshots, motorbike etc. are all part of the diegesis, used to enhance the experience of watching a very quick pace fantasy battle. Since it is an animation all the sounds used are foley sound however they have all been created to sound as close the real thing as possible and haven't been exaggerated like the punching sounds in The Fifth Element.

Men In Black - Headquarters
http://www.youtube.com/watch?v=q3OTEdZkBaQ
A lot of sounds occur at the same time during the beginning if the scene, panning is used so that the sounds heard nearest to camera are louder and then become quiet as the camera zooms back. The announcement can be heard as background noise and so panning is used to make it sound far in comparison to the noises taking place close to the camera. A sound bridge is used when a man is talking to an alien that has apparently just arrived on Earth, mixing is used to make their voices sound louder than everything else happening around them, this allows the audience to gain insight into how this organisation functions as well as foreshadowing later events. Mixing is also used while K and James speak to each other as while they walk through the offices while a lot of other things are happening their voices are still heard over all of it. When they enter the room full of confiscated technology panning is use on the sound of the floating ball which sounds more to the left to match where it is placed, mixing is also used on it since it sounds louder then all the other technology in the room. This is done to draw attention to it both for the audience and James. When the ball goes flying mixing is used on it again to make the sounds of it hitting things and the sound of it moving louder than everything else. Panning is also use on the sound of the ball hitting the walls as it bounces from place to place the sound is also heard based on further right or left. All of the sounds used in the scene are part of the diegesis used to make the environment seem more real and reminiscent of the noise heard in an airport with the announcers and workers. Foley sound is also used a lot since some of the aliens are animation or some sounds wouldn't be heard properly with the rate that the camera zooms out, because of this all of the aliens voices except for the one talking to the man are foley and all the sounds of the technology are also foley. This is done because the sounds being made for the aliens and technology are created to sound otherworldly.


Monday, 21 October 2013

Princess Mononoke Foley Sound Evaluation

Princess Mononoke Foley Sound Video:
http://www.youtube.com/watch?v=IfdLkAhNKic

The first thing we recorded was the deer and horses hooves steps as we could see they were continuously running throughout the clip. The recording of the coconut seemed to fit very well and in sync with the visuals. We made sure that the deer's hooves could only be heard when the camera was close to it and added a fade so that when the deer ran away off screen the sound followed it. We also made the horses hooves quieter than the deers during the shot were the horses can be seen from a distance, this worked since it match with the visuals which showed the horses further away from the camera. When the camera got close to the horses though we made the horses hooves loud since their where two of them and they are heavy animals.

We also made sure that the sound could be heard in sync with the arrows hitting the ground at the very beginning, the sound of a wooden pole didn't sound perfect but it fit well enough. 
We added the sound of a bag being hit by a wooden pole as the sound effect of one of the soldiers attacking the villager and a man shouting this was in perfect timing with the soundtrack which picks up just as the action begins and the virus attacks the main characters arm.
the sound of the virus was perfect, it sounded slimy and other worldly however because it was the made from lettuce swishing around in ketchup, even when turned up to the maximum it was slightly drowned out by the music.

We used the sound of raw meat smacking wood as the sound of the arms being pinned to the tree and although it sounded perfect it didn't quite match the timing of the visuals.  The wind sound effect however, made by simply blowing into the microphone, worked well with the arrows flying through the air and the thump at the end, made by dropping a heavy bag on the floor, was also in time with the body falling of the horse.


All around we did quite well and worked very well together as a team helping each other to make the sounds, as all sound effects apart from the soundtrack were made by us. We however missed a few sounds such as the sounds of the other soldiers and the sound of the panicked villager, the deer and horses are also completely silent apart from their hooves. We also forgot to add in the sound of the bucket being kicked as the deer ran past and also forgot to add any more sounds of the men. There was also some inconsistency as we forgot to add the same twang noise of the arrow from the beginning in the later scenes. The sound of the head being knocked of also doesn't seem to fit with the visual.

The sounds used match with the targeted audience as the anime itself is targeted for older children and teens and so the sounds used are not meant to be cartoony but more realistic. The sounds are very well synced with the action in the scene and some sounds needed to be slowed down so that they sounded right like the sound used to create the virus under the characters arm.
  

Editing Task

If footage has already been recorded then log and transfer should be used so that the footage can be put directly from the camera into Final Cut Pro. If there is already footage saved onto the computer then go to File - Import - Files then a box will come up, find the footage on the computer you want and choose it. 


It will now be in Final Cut Pro were you can drag it into the time line to edit.


The easiest way to add a cross fade is after the clip has been dragged into the timeline you can right click on the end that you want the fade to occur and then click Add Transition "Cross Dissolve."


In order to cut the clip you must press the Razor Blade tool on the window on the right hand lower corner. Then click on the parts of the clip that you want to cut.


In order to crop a clip move the curser to the end that you want to crop, click and hold on the end and then pull it down to the part that you want, this will delete the parts of the clip you don't want but you can also return them by dragging the end of the clip back.  


When you are finished editing the footage go to File - Export - QuickTime Movie.


This box will appear, name your project and then press the arrow next to the Save As box. This will open up Documents so you can find a place to save your finished project. You can change settings to change the quality of the video or if you plan on uploading the video elsewhere you can change the settings to make the video compatible with other sites. Then press Save and wait for the video to finish Exporting.